Features and Benefits

Save More

- Track your savings
- Create budgets
- Monitor spending

Eliminate Debt

- Plan early payoffs
- Budgets for car maintenance
- Monitor debts

Build Wealth

- Watch for trends
- Create investment budgets
- Monitor transactions

Live Generously

- Track your net worth
- Create retirement goals
- Monitor donations

Mobile Access

Freedom to manage your money anywhere

Text & Email Reminders

Keep your spending on track

From mortgages to loans, credit cards to retirement savings, you’ll be able to merge all your data to gain a complete picture of where and how you’re spending your money.

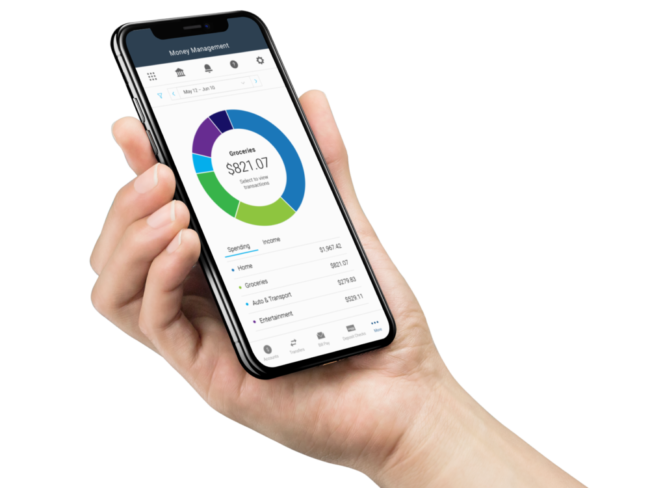
The Money Manager interface automatically categorizes your spending and updates in real-time. This makes it easy to identify trends and make regular check-ins, without ever having to tackle a spreadsheet. You can assess spending by category, graphed out over time, to take a deeper dive into your habits and discover opportunities for saving money.

You can use Money Manager to auto-generate budgets based on your spending history, income, debts, and expenses. The interface communicates this data in colorful budget bubbles that easily and instantly visualize your finances.

You can also interact with these bubbles to view historical monthly budget data, change your projected income, or create custom budget categories.

create a budget

A big part of smart money management is about time management: making on-time payments, planning ahead, and saving enough money for your future. You can sign up to receive alerts via email or text to make sure you’re monitoring your accounts when you need to be.

With all your accounts visible in a single interface, you’ll be able to track your net worth over time and recognize trends that affect it. Then, based on all the data you’ve collected, you can set goals. For instance, if you’d like to increase your savings account by $400, you can set monthly savings targets that will help you move toward that goal.

Learn How-To

Get Started

Log in to your account through Online Banking, and select Money Manager under the “Other Services” tab in the main navigation menu. When you first access Money Manager, you will be prompted to accept our Terms and Conditions. Your primary accounts you have with us will be imported automatically, and we recommend the following next steps when first using Money Manager:

  1. Link your external accounts.
    Add accounts from other institutions so you can view your whole financial picture in one place. Nearly any financial account can be linked! Checking and savings accounts, investments, credit cards, loans, mortgages and other lines of credit can all be added. You can also easily track Cash or Property values by adding manual accounts.
    Tip: Property accounts are important in Net Worth for tracking your high-value assets, such as your house or vehicles.
  2. Review your transaction history.
    Transactions will be automatically cleansed for readability, and categorized to make it easy to see where your money is going. However, not all transactions can be automatically categorized, so it’s important to review your transactions regularly. For example, checks and ATM withdrawals will be left “Uncategorized,” and you will be prompted to assign a category for such transactions. Make any changes necessary to ensure your spending data is complete and accurate.
    It can be helpful to review your Spending chart after reviewing your Transactions. You will better understand how your transaction categories influence your financial reports, and can often reveal spending details that need to be categorized.
  3. Set up a budget.
    A budget makes it easy to visualize how much you’ve spent and how much money you have left for the month. Select “Auto Generate Budget” to let Money Management calculate your average monthly spending in each category for the last two months with complete data. This gives you a realistic starting point for your budget.
    Tip: An auto-generated budget will be more accurate and helpful if you first add any outside accounts and review your transactions so that your budget calculations are based on a full and complete spending history.
  1. Stay in the loop.
    Alerts can keep you notified of important things happening with your accounts, like a low balance or upcoming debt payment.

Categorize Transactions

The Transactions tab provides a consolidated list of your recent transactions from all accounts. Money Manager automatically cleanses and categorizes your transactions to make them easier for you to review and work with. If you don’t have any accounts that were automatically linked, you may be prompted to add an account. When you begin using Money Manager, it will immediately start downloading your transactions.

Categorize Transactions
When your transactions are pulled into Money Manager, they will be automatically categorized. We encourage you to go through your transactions history and check that each transaction is categorized correctly. If you re-categorize a transaction, Money Manager will attempt to remember your preference the next time you post a similar transaction. Customizing your transactions will make Money Management more accurate in the future. To change a category, click on the category you wish to edit and select the correct transaction category from the list.

Log in to your account through Online Banking, and select Money Manager under the “Other Services” tab to get started.
Add Accounts

You can use Money Manager to monitor financial activity across all your accounts in one place, simplifying the way you track your finances. Accounts can be linked from most financial institutions. If you are a new user, you will be prompted to “Add an Account.”

To add an account:

  1. Click “Add an Account” on the right to open the Manage Institutions window.
  2. Search for a financial institution by its name or URL.
  3. Select the institution from the list and enter the requested login credentials.

Log in to your account through Online Banking, and select Money Manager under the “Other Services” tab to get started.

Review Spending

The Spending tab shows you where your money is going, by category, so you can better understand your spending habits and stay on track. Click on a section of the wheel to see how much you spent in each category. If your spending in a category is below 3% of your overall spending, it will be grouped in “Other” with other low-spending categories. Click on any category to see a breakdown of spending by subcategory, such as how much of your spending in Food & Dining is on groceries versus eating out. Click on any subcategory, or on the center of the spending wheel, to see the transactions associated with the selected subcategory. From this view, you can also edit the transaction details just like in the main transactions widget.

Log in to your account through Online Banking, and select Money Manager under the “Other Services” tab to get started.

Create a Budget

Budgets can help you set realistic monthly spending limits and monitor your progress toward hitting those limits. The Budgets tab draws your eye to the categories that need your attention the most — big bubbles represent a larger portion of your monthly budget, and red bubbles have exceeded their monthly allowance.

Auto-Generate Budgets
When you first use Budgets, you have the option to “Auto-Generate Budgets” or to start from scratch. We encourage you to use the auto-generate budgets feature, which will create a starting budget for you based on your average spending in each category over the previous 90 days. This budget calculation will be more helpful if you have added all your accounts first and have reviewed your transaction history for accuracy. Still, you should review your generated budget and adjust them if necessary. The variable nature of initial aggregation can impact the accuracy of your historical spending averages. The size of your bubble represents the budget amount, relative to your overall budget. The larger the bubble, the more of your overall budget that category consumes. The bubble will grow to reflect the percentage the category represents.

Log in to your account through Online Banking, and select Money Manager under the “Other Services” tab to get started.

Set Alerts

Alerts can help you stay on track by keeping you notified of important events in your finances. You must verify your email address and/or your mobile phone number before alerts can be sent to you.

Click the notifications icon (the bell in the upper right corner), then click the setting (sprocket) icon. By default, “simple alerts” are enabled. That means you’ll receive the following alerts on the Notifications tab, via email and mobile:

  • A large deposit over $500 occurs
  • A large expense over $100 occurs
  • An account balance falls below $100
  • You get charged a fee
  • You have a debt payment coming up
  • You exceed a budget

Click on any alert button to disable it. The alert will be grayed out to show that it has been disabled. Alerts will be delivered nightly after account information has been updated. Budget alerts will be grouped into one email. Other alerts will appear in separate emails.

Log in to your account through Online Banking, and select Money Manager under the “Other Services” tab to get started.

Tidy Up Your Finances with Money Manager

View all your bank, investment, and retirement accounts in an instant when you log in to Online Banking or the Liberty Bay mobile app, giving you a personalized experience to manage your money whenever, wherever.

Related topics you may be interested in:
Online Banking

Our free, fast, and secure 24-hour online banking service lets you transfer funds, pay bills, view up to 24 months of statements, and make payments.

Mobile Banking

Get up-to-date balance information, deposit checks, transfer funds, pay bills, and more when you download the Liberty Bay app.

Tips & Guidelines

Your resource for tips, insights, and guides to empower your life with informed financial decisions.

eStatements

Save time, save the planet, and keep your financial information more secure by signing up for e-statements from Liberty Bay.